Monday, January 31, 2011

Day 13 - Who Knew Grocery Shopping Could Be Stylish?

Happy Monday Everyone!!


During my trip to Hobby Lobby on Saturday, I found this bag:


I thought - wouldn't that be cute to fix up and use as a green grocery bag?  So, for $1.99, I threw it in my basket.  My initial thought was to buy those printable iron on transfers and design something cute to put on burlap and then hand sew on the bag.  BUT - the iron on paper was $8.99, and with no job right now, I left those transfers at the check out line.


As I headed home, I decided that I would paint the bag - I knew I had a really cute shade of green acrylic paint at home, and thought I read somewhere that you could paint fabric with acrylic paint.  So I made a few calls (to people who know these things) to make sure that I could do it.  I was told that it's totally fine as long as I heat set it!  Cool - done and done.


I knew that I wanted to do stripes.  Vertical stripes down the center of the bag to be exact.  I didn't want the paint to bleed through the bag, so I stuck a piece of cardboard in it to prevent that from happening.  Then, I lined up painter's tape in the layout I wanted and just started painting.  


After the first side dried, I turned it over and did the same to the back.  Then I just removed the tape, and it looked like this:


After a few hours, when it was good and dry, I ironed both sides (with a cloth laid over the bag) to heat set it.  I wanted to add a little flair, but keep with the natural theme, so I made a pom pom out of twine and attached it to the handle.  All done!!


I can't wait to go grocery shopping now - so fun!


Till tomorrow!


Linking Up to:

The DIY Show Off


Sunday, January 30, 2011

Day 12 - Embellishing my Antique Store Find!!!

Hello...we meet again!  I feel like a crafting fool these past few weeks - whew!  I am having a blast, who am I kidding!


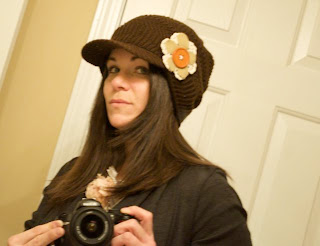
So, yesterday I made a trip to Hobby Lobby and right next door is an enormous antique store.  Hmmm, my husband had Addie, I thought I would browse.... and browse I did.  I was really looking for some specific things, and came up empty - BUT - I did find this cute litte crochet pageboy for $4!!  Love it!


Which brings me to today's craft.  While this little beauty is cute on its own, I still found the need to embellish - I can never let it go!!  What did it need?  You guessed it...a flower!


I had bought some little pre-crocheted flowers at Joann's a few months ago with the intention of using them to embellish some gloves.  Unfortunately - they were too big for that - but perfect for this!


I decided to cut another flower out of some tan cordoroy fabric I had bought in the remnant pile, and added a cute brown button.


Here she is now!


And that brings me to the comical part of this project.  I could have asked my husband to take some photos of me, but decided to let him be and take them myself.  HAHA - not as easy as I thought...


Yeah, that's not gonna work...

And...nice try

Nope, not that one either
Whoa - CLOSE UP!!!
Stupid smile...

That'll do I guess...
The hat is cute though - right??  LOL.  I love it - maybe I should have used my tripod??


Till tomorrow!

Saturday, January 29, 2011

Butterfly Hair Clip for Day 11!

Happy Saturday Everyone!  I wanted to do a quick project today - it is supposed to be 65 degrees here in Atlanta, and I desperately need to get out and about!!!  


I tried a new technique, and I think for my first attempt it came out pretty good.  Of course I had to make a new hair clip for Addie's bow holder that I made yesterday!  I am still loving having that - her bows are so much more organized now!!


So, here it is.  I made a butterfly out of satin and grosgrain ribbon and then attached it to an alligator clip.  Sorry the last pic is a little fuzzy - Addie was painting and I couldn't get her to hold still!


That's it for today!  I am off to go run some errands with my sunroof open :)

Till tomorrow!!

Linking up to:


Photobucket


Friday, January 28, 2011

15 Things

Anne from WobiSobi shared 15 things about herself and then 
tagged me to share as well!  I love these things!!


Here are some things about me:


1.  I grew up in New Jersey, and am still a Jersey girl at heart - fist pump!!
2.  I know every word to "Country Roads" by John Denver.  
It was played at every West Virginia University football game - and 
probably every bar in Morgantown!
3.  I don't have a high threshold for pain, and thus no tattoos.
4.  The hardest thing to give up while I was pregnant was coffee.  
I still had a cup a day - the doctor said it was ok!!
5.  I love to watch ghost hunting shows.
6.  I always do my craft work while listening to the Coldplay 
station on Pandora.
7.  I play tennis, and HAVE to listen to Justin Timberlake for good luck 
before every match!
8.  I will stay up to the wee hours in the morning to see the end of any 
HGTV show - even if I really don't care which house they choose!
9.  My BIGGEST pet peeve is dirty dishes in the sink!  I once had an 
injury from a dirty glass caused by my roommate in college (that's another story).
10.  I met my husband at a wedding - yes, it can happen!
11.  I am the clumsiest person in the world, and will trip over ANYTHING!!
12.  My iPhone and iMAC are my favorite posessions.
13.  My daughter is the greatest gift from God.
14.  My husband and I like to randomly break it down in the 
middle of a commercial break.
15.  I am so thankful for the new friends I am meeting in the blogosphere.  
Everyone is so supportive and talented!  
Thanks for welcoming me with open arms!

There are some random things about me.
Thank you Anne for tagging me - this was fun! 

I am tagging these fabulous and talented ladies:

Shelley at House of Smith's
Amanda at Serenity Now


Day 10 - Hairbow & Headband Holder

Wow - this has been such an exciting week for me!  I need to send out a huge THANK YOU to kojo designs for featuring my necklace on "Friday Fun Finds" AND to A Few of my Favorite Things  for also featuring that necklace on "Favorite Things Friday".  It is such an honor, and I am truly grateful.

For those of you who have been asking for a necklace tutorial, I just have to go buy a chain, and then I should be ready to go.  The chain I used for the original was from an old necklace that I never wore, and I don't have another one in the house.  Thanks for being patient!


OK - on to today's craft.  I am attempting my first tutorial, so bear with me - this may be a LONG post.  Today I made this bow holder:


So, the other day I spent about 10 minutes trying to locate matching barrettes for Addison's hair, and decided that I need to make a bow and headband holder to hang in Addie's bathroom.  I looked all around the house for something I could transform, and my search brought me to a box in the garage labeled "yard sale".  In that box, I found this old frame:


I took it apart and decided to paint the frame and the matte.  Addison's bathroom is bright colors and has a hula girl beach theme, so I wanted it to match.


I painted the frame blue, and the matte a creamy white.


Next, I designed a hula girl in photoshop and printed 2 copies out on white cardstock.  Then, I cut one out around the outline, and saved the full sheet for later.


I wanted to add dimension to the hula skirt, so I gathered about 3 pieces of raffia and tied it into a knot, trimmed the top down to the knot and left the rest long (I wanted to trim it after it was all attached).  Then I hot glued about 15 of those to the skirt.


After she was all assembled, I attached pop dots to the back and stuck her down on top of the other print out that I had saved.


Next, I placed the matte over top of the image and traced around it, making sure it was centered.  I cut the paper to fit and then mounted the matte to the cardstock using my ATG glue runner.  Then I just inserted the matte and image into the frame, and placed the backing over it.


For the ribbon, I just cut 3 pieces of ribbon in two coordinating colors - totaling 6 pieces.  I placed a small dot of hot glue to the top of the pink piece and attached the yellow ribbon.


I wanted to make sure that all three pieces were evenly spaced, so I measured and made dots on the back to mark the spot where I wanted to attach the ribbons.  I attached the two outside ribbons first.


Next, I just needed to make the loop that would hold the headbands.  I took the remaining 2 ribbons, attached the yellow to the pink at the top, looped it around and then glued it together on the back side as well.


The last part was to attached the loop to the center on the back of the frame.  I didn't like how the yellow ribbon wasn't laying flat to the pink, so I decided to place a glue dot on the bottom as well to hold it in place.


Finally, I just stuck one of those Command hooks on the door (so that I can remove it without damaging the door later), and hung up the frame!


I love the way this came out - and Addison was thrilled!!  Till tomorrow!!!


Linking up to: